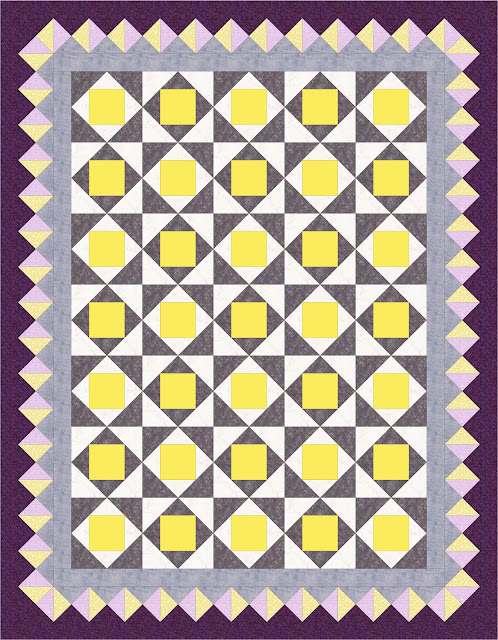
This is the last of the blocks for the sampler, called Big Dipper. At the end of this post, I’ll give the fabric requirements for the borders, and also quilt assembly instructions.
Cutting Instructions:
Light fabric: cut 2 @ 4 1/4 x 4 1/4 inches
Dark fabric #1: cut 1 @ 4 1/4 x 4 1/4 inches
Dark fabric #2: cut 1 @ 4 1/4 x 4 1/4 inches
Draw a diagonal line on the wrong side of each of the light squares. Pair these up with the dark fabrics, right sides together and sew a 1/4 inch seam on either side of the drawn line.Cut apart on the drawn line and press towards the dark fabrics. You will have two pairs of triangle squares.

Take one of these pairs of triangle squares. On the wrong side of one, draw a diagonal line through both fabrics.
Pair this, right sides together, with the second of the pair, with the fabrics opposite to each other, as shown in the photo below. Line up all the edges, and the opposing seamsin the middle, and then sew a 1/4 inch seam on either side of the drawn line.
 Cut apart on the drawn line. You will now have a pair of quarter triangle squares.
Repeat this procedure with the second pair of triangle squares.
Arrange the quarter triangle squares as shown, and sew together.
Go here for the finishing instructions. This last square has the large dark triangles on the outside.
Arrange your blocks as shown in the picture below. Pinning at the meeting points of the triangles is very helpful in getting the points to match. The quilt, as shown with borders added, measures 84×108. Before borders it measures 60×84.
For borders as shown in the picture you will need:
Fabric A, shown as light grey, 1 3/4 yards
Fabric B, shown as mauve, 3/4 yards
Fabric C, shown as dark purple, 1 3/4 yards for border
Fabric D, shown as light yellow/cream, 3/4 yards
Binding 3/4 yards
Instructions for cutting the borders and sewing the pieced border units will be in the next post.

